How to make your Zoom lessons more student-centred
Introduction
5 weeks ago, if someone had asked me for a list of online virtual classrooms, I would have said Adobe Connect, Click Meting, GoToMeeting or even WebEx. Now the most popular answer to that question is Zoom. The company is now worth an estimated 19 billion dollars on the stock market and even British Prime Minister Boris Johnson said he had been ‘Zooming in the morning.’ I wonder if the word Zoom will be used in the same way as ‘to Skype’ or ‘To Google’
I have been using these webinar tools for 15 years. I have trained staff at the Universities of Warwick and Westminster. I have run courses using them and even taught courses about them. The surprising thing is that these virtual classrooms (often referred to as webinar tools) are very different. To effectively use them, you have to understand their essence. The essence of Zoom is built around the screen-sharing tool. If you can understand that, plus some basic settings, you can do some interesting things with Zoom, though personally I would always rather be in the classroom with my students!
It’s all about the screen share button
Without the ability to share your screen with your students and the ability for students to share their screens, Zoom wouldn’t be the tool it is. Other virtual classrooms don’t work this way. For example in Zoom, if I want to share a PowerPoint slide, I have to open it on my computer and then share it to my students through the screen share. In ClickMeeting (another tool) I would simply go into presentation mode and share my PowerPoint slides.
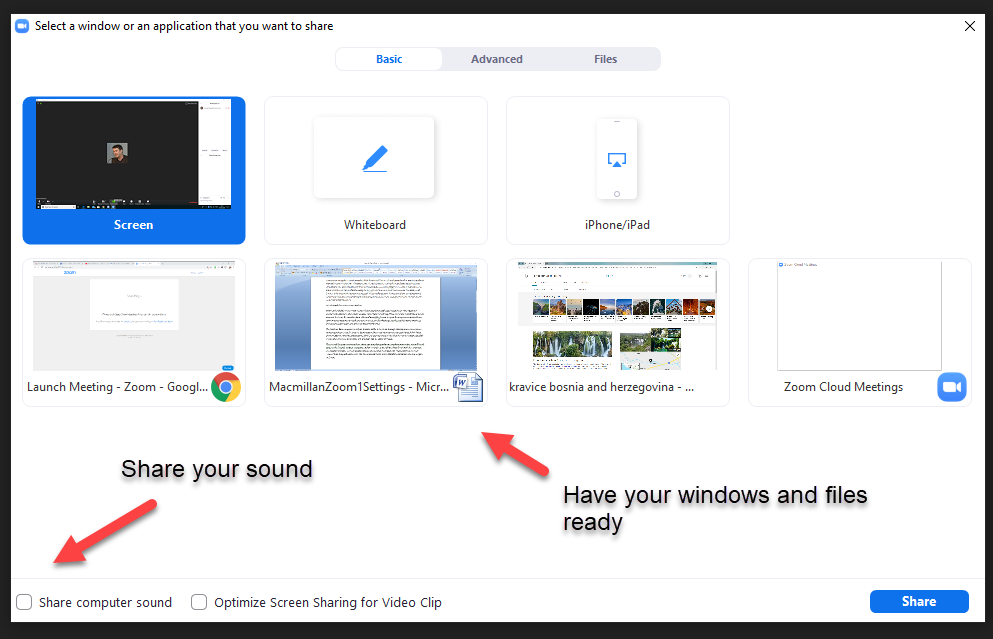
The fact that Zoom requires nearly all funcationality to be done through sharing your screen means that preparation is key. To make a Zoom session flow, you need to have all your PowerPoint slides, pictures, videos, PDF files and anything else you want to share ready. This means that when you click on the share button, all the files and windows will be ready to share.
The second thing to remember is that when you are playing video or anything with audio, you will need to share the ‘sound’ on your computer. So for example, if you play a video from YouTube, then you are playing the video on your screen into the rooms of all your students. If you don’t share your ‘sound’ then they will not hear it. The ‘share sound’ button is in the left hand corner when you open up Zoom and teachers often miss this.
Control
One of the big advantages with the way Zoom works is that you do have control over things like video. For example, because you play the video from your computer, you can pause, stop or end the video whenever you like. Whatever you do, your students will see it. Other systems work differently, which means the students have their own control over the video. This means you often don’t know if the students have even watched the video, as, in theory, they could pause, stop or not even play the video and you wouldn’t know. At least in Zoom that can’t happen as you have full control.
Making your lessons more student focused - 4 levels
Learning to shift from a teacher-centred approach to using a webinar tool in a more student-centred way requires you to build an understanding of the technology. With Zoom, the answer is fundamentally in the ability to screen share, although knowlege of one or two other technologies can also help.
When I run my training sessions, I normally look at this at four different levels.
- Do activities which you control and also engage your students. For example, it might be something as simple as them marking certain word or pictures on the screen you have shared. You might, for example, have a PowerPoint slide and want the students to mark certain linguistic features. You can do this easily by allowing them to annotate (look at the video at the end of this blog). You can make this more student-centred by getting them to give the instructions to each other. This is similar to a student coming to the board and giving another student instructions to come to the board.
- Get the students doing screen sharing to the whole class. This will generally mean only 2-3 students talking at the same time, for example a group of students can present a picture in screen share and then take turns to talk about it to the rest of the class or they could present a website. They could even give a short PowerPoint slide presentation. So this is basically shifting from you standing at the front of the class to getting 2-3 students standing at the front of the class and presenting something.
- Introduce other technologies that allow students to go off, do another activity and then come back into the Zoom room. You can then screen share the results and look at what the students did. I do this all the time and it takes the pressure off me always being the focus. A perfect example is when I ask the students to go into a shared Google Document. I set up the document so that there are spaces for the students to write their opinions. I share the Google Document in the chat, students click on it, write their ideas and then after a specified number of minutes they come back into the Zoom room. I then open up the document in screen share and we can all look at the work they did. If I am working with young learners I usually use something like Padlet, because I can moderate their posts before they actually appear in the document. Another tool I commonly use is Google Forms. I create quizzes and questionnaires and get the students to go off and complete the quiz or questionnaire and then I turn on screen share and we look at the overall results. This way I am able to focus on the areas where the class had problems, etc. These technologies give you space as a teacher and create a new dynamic as the students move out of the teacher-centred context to do some work alone or in pairs or groups
- The outstanding feature of Zoom is the ability to use breakout rooms. If you put students into breakout rooms, make sure you have given them permission to share their screens and make sure you have also given them access to the Interactive White Board (IWB) (you do this in settings - watch the video at the end of this blog). If students can share screens and have access to an IWB they can do all sorts of things in groups. The teacher is able to jump in and out of the groups to listen and then bring the students back to the main lesson at any time. The breakout rooms work best when one of the team members shares something on the screen for the students to discuss or work on, which is why it is vital to have the IWB and screen share activated for the students (watch the video on screen sharing).
Lots of the tools out there are good, and Zoom is seeing a huge surge in popularity at the moment. The essence of Zoom is the ability to screen share and the more you understand how to exploit this and the more you know about the settings related to screen sharing, the more effective your lessons will be.
Help with Zoom
All about screen sharing
https://www.teachertrainingvideos.com/zoom-screen_sharing_tutorial
All about setttings
https://www.teachertrainingvideos.com/key_settings_when_teaching_with_zoom
All about break out rooms
https://www.teachertrainingvideos.com/complete_breakout_rooms_training
About the Author

Russell Stannard is the founder of www.teachertrainingvideos.com and a NILE associate trainer where he runs a ‘Flipping your Classes’ course and works on the MA course. He is the winner of 3 educational awards including the Times Higher ‘Outstanding Initiative in Technology’ and the British Council ‘ELTons Innovation Award’. Russell writes regular columns in the English Teaching Professional and has published widely in the area of feedback, collaboration and the use of screen capture. He is truly an international speaker, having presented in over 40 countries around the world.